Quick Intro
This is probably the most cost effective way to implement SQM on your network. It costs about $40 when it’s on sale and if you do some work it will be significantly better than most consumer routers. It also comes with great WiFi chips and has great specs overall. Significantly cheaper than our enterprise setup (hEX + Unifi AP or ER-X + Unifi AP). Great for those of you on a budget! This method can support connections up to ~600 Mbps if you turn CTF (NAT Acceleration On)
The TM-AC1900 is basically a rebranded Asus RT-AC68U. If you replace the T-mobile firmware with Asuswrt-Merlin, you can then enable SQM (fq_codel) and never lag again! With the custom firmware you’d pretty much unlocked the full potential of the AC-68U. This method is seriously best bang for your buck if you get a good unit and have the time to flash Asuswrt-Merlin.
Price Checking and Buying Advice
You can see previous deals on a pre-owned TM-AC1900 through slickdeals.
As you can see the lowest it’s ever been is $38. As a tip if you buy a router from T-Mobile make sure you choose the “No Credit Check” option so you don’t get hard inquiries on your credit. Side note, sometimes you get lucky and get a unit that looks and feels brand new!
Asuswrt-Merlin Flashing Guide
To start follow the guide on here: http://www.bayareatechpros.com/ac1900-to-ac68u/
Some notes about the guide…
For Step 15
We will be using an Asus/Merlin Build so stick with 1.0.2.0 US Ai Mesh as the option after uploading the CFE mentioned in this step to the https://cfeditor.pipeline.sh/ site.
For fixing the MTD5 partition:
Perform the following commands instead of the one on bayareatechpros
# Backup MTD5 (dd produces identical bin)
cat /dev/mtd5 > /jffs/mtd5_backup.bin

# Copy mtd5_backup.bin from router using scp
# From host: scp admin@192.168.1.1:/jffs/mtd5_backup.bin ./

# Mount MTD5
mkdir /tmp/asus_jffs
mount -t jffs2 /dev/mtdblock5 /tmp/asus_jffs

# Copy mtd5 files from router using scp
# From host: scp admin@192.168.1.1:/tmp/asus_jffs/* ./

# Wipe mtd5 files and reboot
rm -rf /tmp/asus_jffs/*
sync && umount /tmp/asus_jffs
rm -rf /jffs/.sys/RT-AC68U
nvram unset fw_check && nvram commit && reboot
For Step 24
Go to https://sourceforge.net/projects/asuswrt-merlin/files/RT-AC68U/ and download 380.70 from releases.
Update 10/7/2018: The 384 branch may have WiFi instability issues. Choose the latest version from the 380 branch if you want stability. Source.
Unzip that download then login on your router’s web interface at 192.168.1.1. After that navigate to Administration then choose the “Firmware Upgrade” tab. Click “Choose File” and select the .trx file you just unzipped. Finally click upload and wait for the Merlin firmware to flash. After it’s done flashing wait 15 second and power off and on the router. Now you have a really powerful router!
Enabling SQM (fq_codel) to stop bufferbloat
In the web interface (192.168.1.1) login and choose “Adaptive QoS”. Select the “QoS” tab and click “Enable QoS”.
Here choose..
QoS Type: “Adaptive QoS”
Bandwidth Setting: Manual
For your “Queue Discipline” choose “fq_codel”. It is the best algorithm of the three.
“WAN packet Overhead” Options.
If unsure, either choose a preset that is closest to your actual connection technology (Cable (DOCSIS), VDSL or ADSL2), or leave it to 0. Source
For “Upload Bandwidth” set to 85% of your max upload speed.
For “Download Bandwidth” 85% of your max download speed.
Apply changes.
Calibration and Testing
Run “ping www.google.com -t” in command prompt and then run the speedtest.
If you still have an A rating, with low pings during the speedtest. You can incrementally increase your total bandwidth above the 85% you initially set until pings start to spike higher than desired.
Otherwise if your rating is not good or you are getting bad pings try reducing the max bandwidth limits. (Ex. If 85% is still lagging try 80%.)
Doing this allows you find the sweet spot between getting max bandwidth vs experiencing high pings.
Enabling CTF (NAT Acceleration)
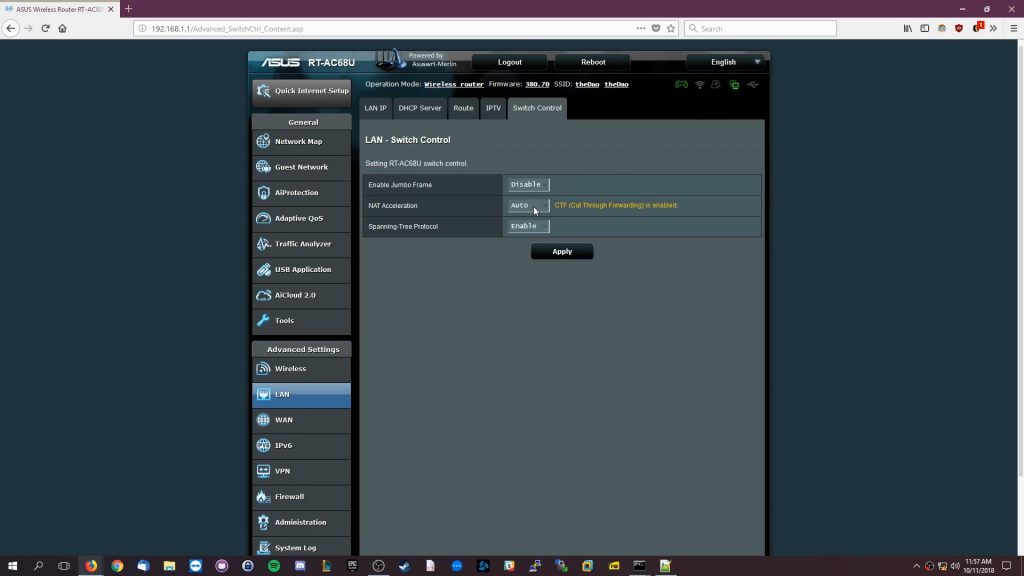
Optinally, you’d want to enable this feature if you have speeds higher than 280 Mbps with “Adaptive QoS” enabled. By enabling NAT acceleration you can manage up to 430 Mbps (Source). It is located in LAN -> Switch Control -> Nat Acceleration. Set to “Auto” to turn it on. Turning on NAT Acceleration might make some router features unusable such as IP Traffic Monitoring and Parental Controls…
